How to Unpublish a WordPress Site: Pages, Posts, and The Entire Domain
Sometimes you need to remove some or all of your content from your WordPress website. With a few clicks, you can easily modify your website to only show the content you want!
Justin Gluska
Updated May 7, 2023

digital art of a pencil with an eraser sitting on a desk next to a closed macbook laptop in 4k
Reading Time: 8 minutes
All website owners are looking to drive traffic to their sites, that’s a fact. In order to increase their websites’ Google ranking, site owners must write engaging content, target long-tail keywords, and optimize for SEO. In fact, if you're a WordPress site owner, you've probably done these too.
However, there are times when posts, pages, or even the entire site shouldn’t be online. When this happens, you just have to take it down.
For example, when your site's in maintenance mode, or you decide to keep some content away from users' eyes, you'll have to unpublish your WordPress pages, posts, or the entire site, hiding it from the public.
Shutting down your WordPress website is easy, and there are many methods to do it. For starters, you can set up a page informing visitors that your site isn’t currently available. Additionally, you can use passwords to protect your site's directories at the server level.
Let's explore some ways to keep your WordPress content private and inaccessible to visitors.
How to Unpublish WordPress Pages, Posts, and a Site Domain
As a content management system (CMS), WordPress has a default feature that allows you to change the status of published posts from public to private or draft.
Here are four easy to follow steps to unpublish your posts and pages from WordPress’ content editing screen.

- Go to the Posts or Pages sections in WordPress' admin dashboard.
- Then, open your desired post or page.

- Find the Switch to draft option in the upper screen.
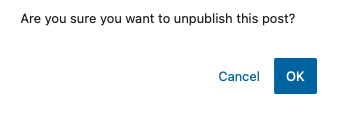
- Click on it and select OK to unpublish your post or page.
You've done it! Your WordPress post or page has become inaccessible to visitors. Only the posts’ and pages’ author and website administrators can see them now.
Remember that changing a published post's status to draft can cause a drop in the site's ranking. To avoid this from happening, password-protect your WordPress content or just switch the post’s status to private. When users try to access the private post, a 404 error page will greet them. If you need it removed from a search engine like Google, you should submit a removal request in Google Search Console. This will ensure content is removed from the public eye as fast as possible. If you don’t have Google Search Console setup or can’t be bothered to submit the request, over the next few days Google will automatically remove it from search engines when it realizes this page is no longer live on your site.
Using the Advanced Plugins to Hide Pages and Posts
Unfortunately, WordPress doesn't give you much control over page visibility. It only allows you to lock your content behind a password.
In other words, you can’t protect pages and posts by user roles.
This is where advanced password protection plugins come in, like Password Protect WordPress (PPWP), WPShield Content Protector, Passster, and Access Category Password, among others.
Most of these solutions are either free or have a subscription model. The great thing about them is that they're simple to use and let you lock your content with passwords by user roles. Only logged-in users entering a specific password can open and view the posts or pages.
Unpublishing Several WordPress Pages or Posts at Once
To unpublish multiple WordPress pages or posts at the same time, do the following.
- Go to Pages or Posts and then click All Pages or All Posts.
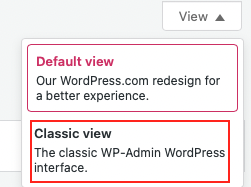
- Select Classic view from the top screen.
- From there, check the box next to the pages or posts you want to unpublish.
- Next, select the Bulk actions dropdown. Choose Edit.
- After, click Apply. This adds new settings, giving you more control of your selected content. For example, the platform allows you to change a post's author or turn all of the articles into sticky posts.
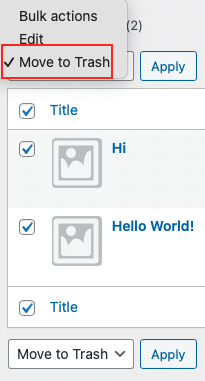
- Also, you can move several pages to the trash at once. Just open the Bulk options dropdown and select Move to trash.
- Then, select Apply.
How to Make a WordPress Page Members Only
Alternatively, you can hide a page based on a visitor's membership level. Users who aren't members of the site will have to sign up to see a post or page. This is a great way to grow your lead pool and add more prospects to your email list.
In fact, you can even charge membership fees, a way to make even more money from your WordPress site.
Now, to create a membership page and essentially lock your content behind a subscription, you'd have to use a WordPress membership plugin. There are many to choose from, like MemberPress, aMember Pro, s2Member, OptinMonster, and MemberMouse, to name a few.
Remove Your WordPress Website from Search Engines
If you want, you can also shut down your whole WordPress site. To do this, you'd need to discourage search engines from indexing it.
This may sound challenging, but it's super easy. All you have to do is click a button.
- Head to Settings.
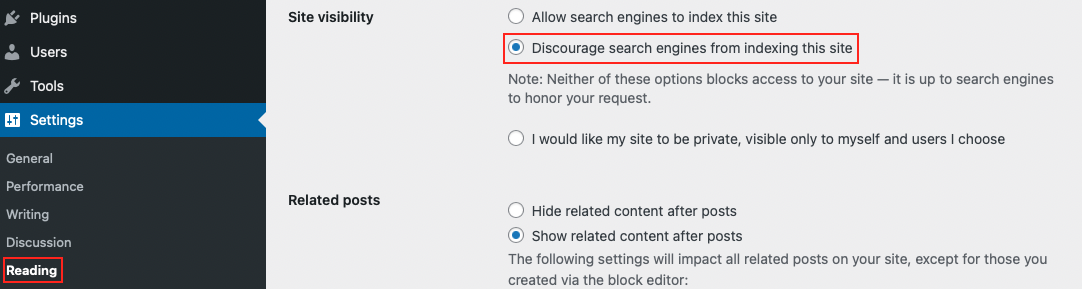
- From there, click Reading.
- Find Search Engine Visibility and tick the box to discourage search engines from indexing your site.
That said, this method has some limitations. For example, your content will still be indexed if it's hyperlinked to other websites. Which is almost certain when your content is popular.
What's more, it harms your site's SEO. There's a good chance this will make you lose nearly all your rankings and any SEO effort you've put into your website.
The best way to unpublish or hide your site is to use other methods, like the noindex meta tag or password, to protect your whole site. Plugins like PPWP Lite and Yoast SEO can help with that.
How to Delete Your Entire WordPress Site
Permanently deleting your WordPress site isn’t hard at all. It's a matter of clicking some buttons. Also, if you change your mind, WordPress gives you 30 days after deleting your website to reverse the action.
- Go to your site’s dashboard and select Settings.
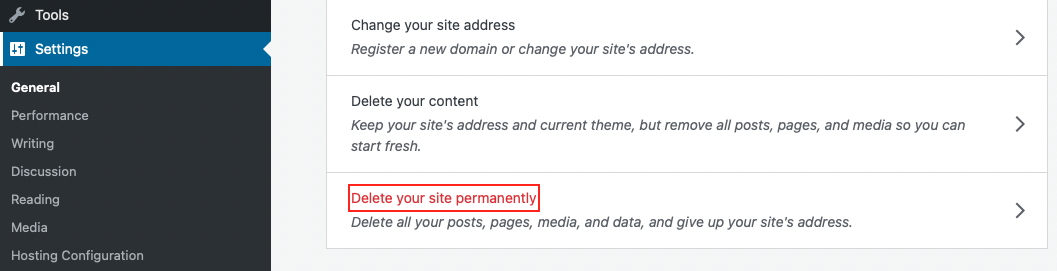
- Choose Delete a site.

- Export your content (if you want). It’ll be a zip file.
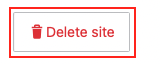
- Go to the bottom of the page and click Delete Site.
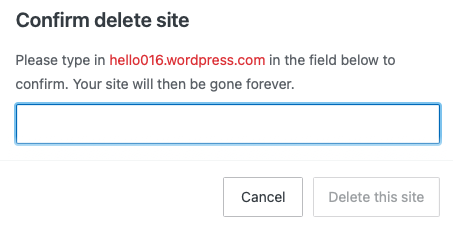
- Type in the correct name of your site.
- Select Delete this site to delete your WordPress website forever.
If you have upgraded your site and purchased additional storage, domain name, or a premium theme, WordPress will ask you to cancel your paid upgrades before proceeding with deleting your site.
What's more, to completely delete a self-hosted WordPress site, including its files, you'll have to do the following.
- Create a backup copy, as shown above.
- Delete WordPress site files. To do this, you'd need to use File Manager, a web-based app that allows you to manage your site's assets. Once inside the application, select all files to delete them.
- Delete the MySQL database. Just go to the cPanel and look for MSQL Databases. Then, click on it and delete the database of the site you've already deleted the files from.
- Remote your content from search engines. This must be done because search engines, like Google, Bing, AOL, or Yahoo, show sites even after they've been deleted. To remove your site from search engines, you'd need to use the tools of each search engine itself, like Bing's content removal tool.
- Send an email to Wayback Machine and ask them to delete their archive and snapshots of your site.
That’s it. Now, you've completely deleted your WordPress site and its hosting files.
Conclusion
So now, hopefully learning how to unpublish and delete WordPress pages, posts, and your whole website is not as complicated as you initially thought! Looking to hide some of your pages or posts? Just change their status to drafts in the edit screen. Or make them private so that only admins can view them.
If you want other features, like unpublishing an entire WordPress site without harming your SEO or locking content behind membership plans and passwords, you'll have to use dedicated plugins. Thankfully, most of them are free and simple to use.
With a little bit of effort, you’ll be on your way to building the best WordPress website for your business. Good luck! Have any questions? Leave a comment below!
Want to Learn Even More?
If you enjoyed this article, subscribe to our free newsletter where we share tips & tricks on how to use tech & AI to grow and optimize your business, career, and life.